SI Editor Table Menu - Tips and Tricks 

In this Topic HideIn this Topic Show
  1. Edit Mode
  2. Saving Edits
  3. Editing Formatted Tables with Revisions
  4. Cell-to-Cell Navigation
  5. Right-Click Menus
    1. Table Right-click menu:
    1. Edit Right-click menu:
    1. Browse To Hyperlink Right-click Menu Option:
  6. Selecting Columns, Rows, Or Cells
    1. Adjusting Rows and Columns
  7. Tailoring
  8. Brackets
  9. How To Use this Feature
    1. To Duplicate a Formatted Table for Editing With Revisions:
    1. To Copy and Paste A Table, Cells, Columns, Or Rows:
    1. To Copy an Excel spreadsheet, Word, or other table into a SpecsIntact Formatted Table:
  10. Technical Support Information

SpecsIntact Formatted Tables are unique to the SI Editor. Before editing, understand their specific functionality. You'll find helpful editing tools in the Table menu and Right-click menus. To simplify editing, tags are only visible in Edit Mode.
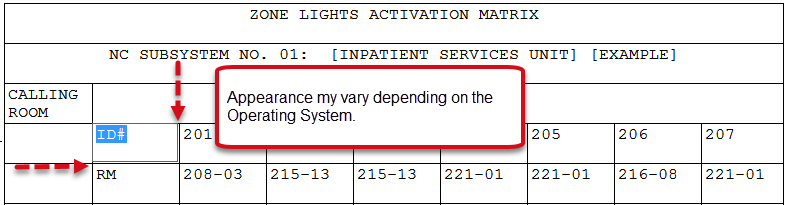
Illustration Icon Indicating CautionFor optimal display, avoid placing text or brackets on the same line as a Formatted Table (TAB) tag.

Edit Mode

Edit Mode in Formatted Tables is activated by clicking in any cell. From there, you can start entering data, applying formatting, or adding tags. To cancel Edit Mode, press the ESC key.

Saving Edits

  1. To save the changes, click in another cell or outside the table and perform one of the following:
    1. Click the Save button on the Toolbar
    2. Select the File menu and select Save
    3. Use the keyboard shortcut Ctrl+S

Editing Formatted Tables with Revisions

For the best experience editing Formatted Tables with RevisionsThe Revisions command reveals or conceals Revisions that are tagged in the text. Text to be added is identified with underscoring and the addition tags, <ADD> and </ADD>. Whereas text to be deleted, or Redlined, is identified with overstriking and the delete tags, <DEL> and </DEL>, we recommend duplicating the Formatted Table by 1) selecting the table 2) copying, 3) deleting, then 4) pasting it below the existing Formatted Table. By doing this, the ADD and DEL tags will be eliminated from each cell that has been edited, making the Formatted Table easier to edit and read. Refer to the 'How To Use This Feature' section at the end of this topic.

The illustration below clearly shows the changes made to the table. The original table is marked with DEL tags, indicating its removal, while the new table is marked with ADD tags, signifying its addition as a replacement. This visual representation shows the original table has been deleted and a new one has been inserted in its place, ready to edit.

Illustration Illustration Editing Formatted Tables with Revisions

Cell-to-Cell Navigation

Navigate cells using the Tab key to quickly move to the next cell. Arrow keys control movement within the cell during editing while Edit Mode is active. When you reach the end of the cell content, arrow keys will move to the next cell.

Right-Click Menus

There are three Right-click menus available while working with Formatted Tables:

Table Right-click menu:

The standard Table right-click menu provides options for changing the entire table. This pop-up menu is activated by hovering over a row or cell and right-clicking.

Illustration Icon Indicating Important Information To NoteMenu options that appear inactive require either cell(s), row(s), column(s), or text to be selected.  

Illustration Icon Indicating How To StepsClick on the image right-click menu option below to display details for each function.

Illustration SI Editor's Formatted Table Right-click Table MenuHyperlink to the SI Editors Table Menu - PropertiesHyperlink to the SI Editors Table Menu - Select TableHyperlink to the SI Editors Table Menu - Show Column HeadersHyperlink to the SI Editors Table Menu - Export Excel XML SpreadsheetHyperlink to the SI Editors Table Menu - Import Excel XML SpreadsheetHyperlink to the SI Editors Table Menu - Make Columns Same WidthHyperlink to the SI Editors Table Menu - Make Rows Same HeightHyperlink to the SI Editors Table Menu - Column WidthHyperlink to the SI Editors Table Menu - Row HeightHyperlink to the SI Editors Table Menu - DeleteHyperlink to the SI Editors Table Menu - InsertHyperlink to the SI Editors Table Menu - Clear Background ColorHyperlink to the SI Editors Table Menu - Set Background ColorHyperlink to the SI Editors Table Menu - JustifyHyperlink to the SI Editors Table Menu - Unmerge All CellsHyperlink to the SI Editors Table Menu - Unmerge Cells

Edit Right-click menu:

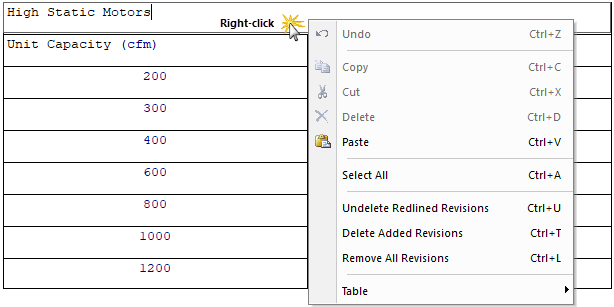
The Edit right-click menu is available when the Edit Mode is active. To activate this menu, click in the cell, then right-click. This menu offers a variety of helpful tools and for added convenience, includes a full pop-up Table right-click menu.

Illustration Icon Indicating How To StepsClick on the image menu option below to display details for each function.

Hyperlink to the SI Editors Table Menu - Table MenuHyperlink to the SI Editors Edit Menu - Remove All RevisionsHyperlink to the SI Editors Edit Menu - Delete Added RevisionsHyperlink to the SI Editors Edit Menu - Undelete Redlined RevisionsHyperlink to the SI Editors Table Menu - Select AllHyperlink to the SI Editors Edit Menu - PasteHyperlink to the SI Editors Edit Menu - DeleteHyperlink to the SI Editors Edit Menu - CutHyperlink to the SI Editors Edit Menu - CopyHyperlink to the SI Editors Edit Menu - Undo

Browse To Hyperlink Right-click Menu Option:

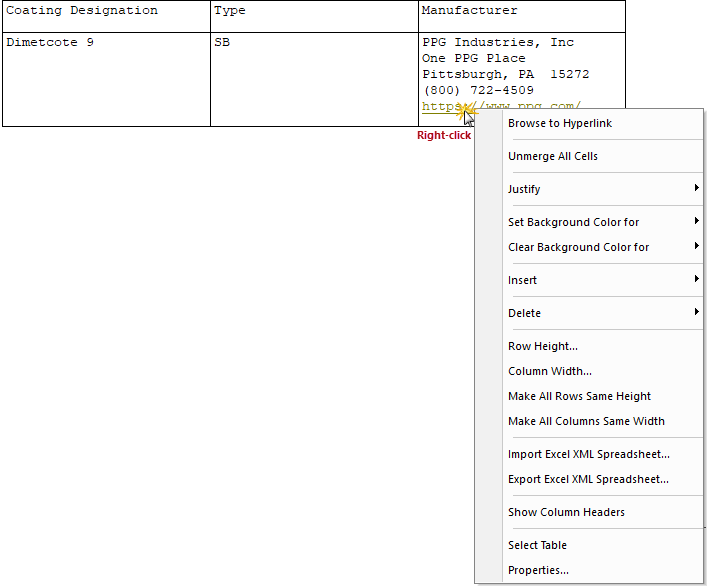
The Browse to Hyperlink right-click menu option becomes available in the right-click menu when a hyperlink is activated by placing the cursor over a hyperlink, right-clicking and selecting Browse to Hyperlink.  This option will open the hyperlink in your default Browser (e.g., Google Chrome, Microsoft Edge, etc.).

Illustration Icon Indicating How To StepsClick on the image menu option below to display details for each function.

Hyperlink to the SI Editors Table Menu - PropertiesHyperlink to the SI Editors Table Menu - Select TableHyperlink to the SI Editors Table Menu - Show Column HeadersHyperlink to the SI Editors Table Menu - Export Excel XML SpreadsheetHyperlink to the SI Editors Table Menu - Import Excel XML SpreadsheetHyperlink to the SI Editors Table Menu - Make Columns Same WidthHyperlink to the SI Editors Table Menu - Make Rows Same HeightHyperlink to the SI Editors Table Menu - Column WidthHyperlink to the SI Editors Table Menu - Row HeightHyperlink to the SI Editors Table Menu -  DeleteHyperlink to the SI Editors Table Menu - InsertHyperlink to the SI Editors Table Menu - Clear Background ColorHyperlink to the SI Editors Table Menu - Set Background ColorHyperlink to the SI Editors Table Menu - JustifyHyperlink to the SI Editors Table Menu - Unmerge CellsHyperlink to the SI Editor Right-Click Menu - Browse To Hyperlink

Selecting Columns, Rows, Or Cells

  1. To select multiple columns, rows, or cells, perform one of the following:
    1. Hover over a row or column and drag your cursor to select multiple rows or columns
    2. Place your cursor in the first cell, hold the Shift key and click the last cell to select multiple rows or columns
    3. Place your cursor in the first cell, hold the Shift key and use the arrow keys to select multiple rows or columns

Illustration Formatted Table Selecting Cells

Illustration Icon Indicating Helpful HintTo avoid complications while editing tables, it is best to temporarily disable the View menu > Tags Illustration Tagsbar Toggle Tags button until you've entered all your data. 

Adjusting Rows and Columns

When adjusting row(s) heights, begin from the bottom of the table and work upwards, or use the Row Height command.  Similarly, when adjusting column widths, begin from the rightmost column and move leftward or use the Column Width command.

Tailoring

TailoringTagged elements <TAI> </TAI> inserted by the Master Specification writer to indicate specific elements within a specification. These tags allow them to include or exclude requirements based on factors like agency or product. This pre-editing removes irrelevant requirements, simplifying customization for each project Options can be applied to an entire table, however, the Tailoring tag must be on the same line as the Formatted Table (TAB) tag. Tailoring within a table becomes more complex when adding or removing Tailoring Options since there is no way to tailor an entire row or column. To apply Tailoring, the data within the cells are tailored individually. When using the Tailoring Options tool to remove these options, blank rows or cells will remain, therefore, they must be manually deleted by the individual editing the Section.

Brackets

Inserting brackets within a Formatted Table is more complex, especially when a row or multiple rows need to be bracketed.

There are two options to consider: 

  1. Divide the table into smaller tables. Brackets can be inserted before the beginning TAB tag and after the closing TAB tag of each table. 
  2. Enclose this content within brackets, and then replicate this approach consistently across all cells in the row.

When using Bracket Replacement, if the brackets and their content are removed from a cell, any resulting empty rows should also be deleted.

How To Use this Feature

Illustration Icon Indicating How To StepsTo Duplicate a Formatted Table for Editing With Revisions:

  1. In the SI Editor, navigate to the Formatted Table you wish to duplicate
  2. Right-click on the table, choose Select Table, and perform the following:
    1. Press Ctrl+C to copy the table
    2. Press the Delete key
    3. Press Ctrl+V to paste the table

Illustration Icon Indicating How To StepsTo Copy and Paste A Table, Cells, Columns, Or Rows:

The SI Editor's Copy, Copy Without Tags, and Paste commands can be used in many ways.  You can either copy and paste text into a table cell, column, row, the same table, or other SpecsIntact tables.

SpecsIntact Formatted Tables require a pre-existing structure for pasting content from Excel or Word. Before pasting, insert a blank row or column, or create a new table.

Copy and paste Techniques:

  1. To copy and paste a Formatted Table, perform one of the following:
    1. Right-click and select Copy or Copy Without Tags, then right-click and select Paste
    2. Click the Copy button followed by the Paste button on the Toolbar
    3. Use the keyboard shortcuts to copy Ctrl+C or Ctrl+E, then Ctrl+V

Illustration Icon Indicating How To StepsTo Copy an Excel spreadsheet, Word, or other table into a SpecsIntact Formatted Table:

Many organizations have restricted the use of Excel XML spreadsheets. SpecsIntact streamlines the import of data from Excel, Word, and other applications by enabling simple copy-and-paste functionality.

  1. In the SI Editor, perform one of the following:
    1. Select the Table menu and select Insert, then select Table
    2. Click the Formatted Table button on the Toolbar
    3. Use the keyboard shortcut F9
  2. In the Insert Table window, specify the Number of columns and Number of rows that correspond to the spreadsheet
  3. Click OK
  4. Copy the source table from Excel, Word, or another application
  5. In the SI Editorhighlight the table, then perform one of the following:
    1. Right-click and select Paste
    2. Use the keyboard shortcut Ctrl+V
  6. To save the changes, click outside the table and perform one of the following: 
    1. Click the Save button on the Toolbar
    2. Select the File menu and select Save
    3. Use the keyboard shortcut Ctrl+S


Users are encouraged to visit the SpecsIntact Website's Support & Help Center for access to all of our User Tools, including Web-Based Help (containing Troubleshooting, Frequently Asked Questions (FAQs), Technical Notes, and Known Problems), eLearning Modules (video tutorials), and printable Guides.

CONTACT US:
  256.895.5505
  SpecsIntact@usace.army.mil
  SpecsIntact.wbdg.org