The SpecsIntact Job lifecycle provides a comprehensive road map for creating, editing, and finalizing construction specifications using the SpecsIntact software. Following these steps ensures your project documentation is accurate, consistent, and compliant.
Setup and Initial Customization
- Software and Master Preparation:
- First, verify that you have installed the latest version of SpecsIntact. If not, you can download a newer version directly from the SpecsIntact Website.
- Ensure you have the most current UFGS Master specifications available. SpecsIntact often offers to automatically download the latest UFGS Master during installation or startup.
- Project Coordination:
- Collaborate closely with your project manager, architect, or engineer. This step is vital for defining project specifics like the agency, project method (e.g., Design-Bid-Build, Design-Build), and preferred units of measurement (English, Metric, or both). This upfront coordination saves significant time later.
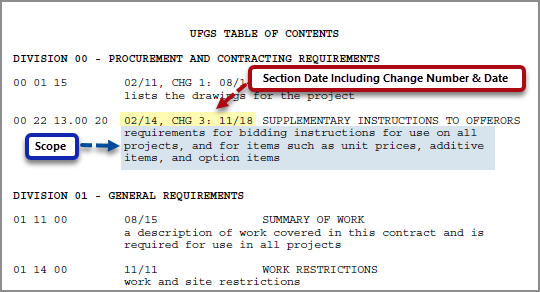
- Master Table of Contents Review:
- Print the Master Table of Contents with Scope document, found within the UFGS Master as SCOPE.doc, to see a list of all Section numbers, titles, and a brief description of the Section requirements for each Section.
- Send the Master Table of Contents to the architect or engineer to precisely identify which Sections are required for your project.
- Initial Tailoring:
- Export and print the Tailoring List for review by the project manager, architect, or engineer, who will then mark which Tailoring Options to remove.
- Based on the returned list, tailor the Job to remove any irrelevant tailored text. This process will help streamline the Job's specifications.
- Job Creation:
- Once the marked-up Master Table of Contents is returned, create a new Job within SpecsIntact that contains only the Sections specified by your team. SpecsIntact automatically adds the 01 33 00 Submittal Procedures and 01 42 00 Sources For Reference Publications Sections, as these are essential for proper Job processing.
Editing and Quality Assurance
- Generate Initial Print for Review:
- Use the Process and Print/Publish function to print the requested Sections, making sure to show Notes, and include the Submittal Register in the output. This printout will be sent to the project team to establish a foundational baseline for the review and editing process.
- Detailed Editing and Revision Control:
- When the edited Sections are returned, begin making your changes. Always edit with Revisions and Tags visible on the screen.
- Use the Toolbar buttons to toggle Marks, Notes, and Revisions on/off, whenever it helps your editing workflow.
- As you edit, save the Section frequently. Each save generates a Validation Log that will flag errors when they are detected. These errors should be resolved while editing each Section.
- Formatting and Final Checks:
- After all content changes are made, run a Spell Check.
- Visually inspect the formatting by toggling all screen elements off. Check for consistent spacing and lines. Generally, you should have one blank line between elements like References, Submittals, text paragraphs, items, and lists.
- Before deleting any blank lines or extra spaces, turn Revisions and Tags off and Marks on. Remember, Revisions should only indicate technical changes, not formatting adjustments.
- Continuous Quality Control and Reporting:
- Throughout the editing process, make it a habit to use the SpecsIntact Explorer's Process & Print/Publish or Process Only function. These actions generate crucial reports and perform reconciliation (processing the entire Job for accuracy).
- Address errors and discrepancies immediately when you find them. After each correction, regenerate your reports until all findings are cleared. This approach prevents minor issues from compounding into significant problems and should be consistently applied throughout the Job lifecycle to avoid a backlog of issues at the very end.
Finalization and Output
- Create the final Job output when the Job is complete and error-free from the SpecsIntact Explorer's File menu > Process & Print/Publish options.
- Ensure all reconciliation options are selected (e.g., Addresses, References, and Submittals).
- Choose your desired output file type by selecting the appropriate printer (e.g., physical printer for hard copies or the SpecsIntact PDF or Adobe PDF printer for PDF output). PDF and Word files are produced electronically.
- Important Note: The Submittal Register is generally not visible in the SpecsIntact Explorer unless it is exported or published to PDF. If your chosen output format is Word, the Submittal Register will not be able to be published within that file type.
Users are encouraged to visit the SpecsIntact Website's Support & Help Center for access to all of our User Tools, including Web-Based Help (containing Troubleshooting, Frequently Asked Questions (FAQs), Technical Notes, and Known Problems), eLearning Modules (video tutorials), and printable Guides.