This command can be executed from the SI Explorer's Toolbar command, Right-click menu, or keyboard shortcut Ctrl+P.
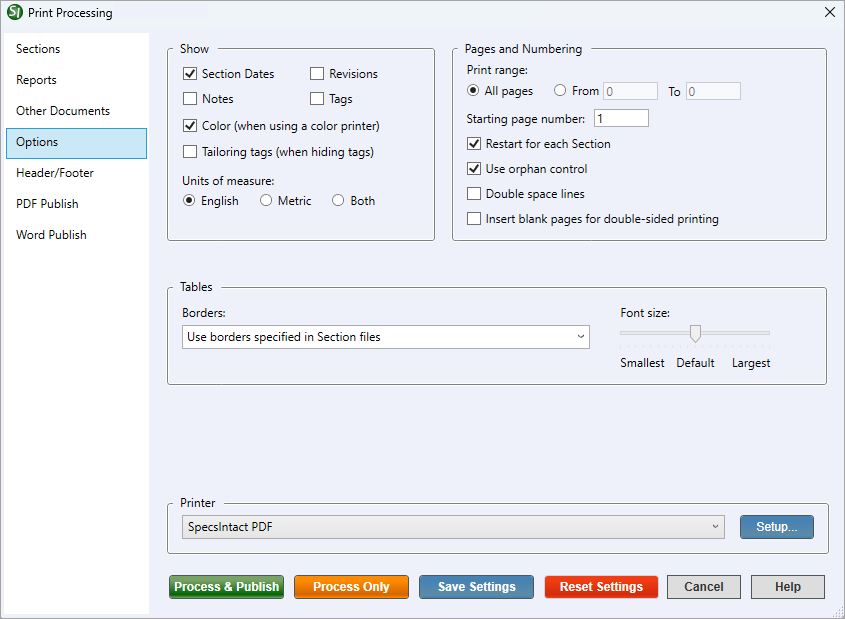
This screen provides a range of options for personalizing the output precisely to your project needs.
![]() Click the Sidebar tabbed commands on the image below to see how to use each function.
Click the Sidebar tabbed commands on the image below to see how to use each function.

Show and Units of Measure

Show
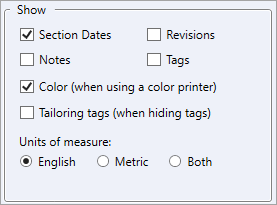
Provides check boxes for the elements you want visible in the processed Sections. Checking one or more of the options will include that element. Below Show, Section Dates , and Color (when using a color printer) are selected by default.
![]() By checking the option to show Tags, all tags will be visible in the processed Sections. Optionally, you can choose to see the Tailoring tags by displaying them independently within the processed Sections.
By checking the option to show Tags, all tags will be visible in the processed Sections. Optionally, you can choose to see the Tailoring tags by displaying them independently within the processed Sections.
Units of Measure
For Jobs and Master, you can choose either English, Metric, or Both. For Jobs, the default setting is English, while the default for Masters is Both.
![]() Units of Measure are determined by the global 'Use this setting when printing' option accessible in the File > Job Properties > Options tab.
Units of Measure are determined by the global 'Use this setting when printing' option accessible in the File > Job Properties > Options tab.
Pages and Numbering

Print Range
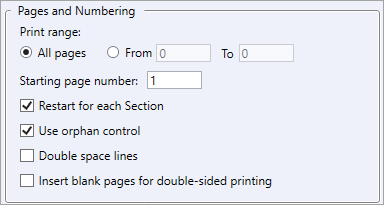
You can print All Pages within the selected Sections, or use the 'From-To' option to specify a range of pages to be included. The Print Range default setting is set to All Pages.
Starting Page
The Starting Page Number box allows you to set the number assigned to the first processed page. This function is commonly used when you want a Cover Page as page 1 instead of the first page of a Section. This ensures your cover page appears as page 1 but doesn't disrupt the subsequent numbering by empowering you to customize the numbering scheme.
Restart for Each Section
When checked, the pages will be numbered sequentially within each Section selected. If this option is not checked, all selected Sections will be numbered as one document.
Use Orphan Control
Use this feature to enable or disable the control that keeps a Title (within the TTL tags), Reference Organization (within the ORG tags), or a Formatted Table Header from being printed alone as the last line on a page.
![]() Click here to learn more about Widows and Orphans.
Click here to learn more about Widows and Orphans.
Double Space Lines
The double spacing provides ample room for editors and proofreaders to leave comments, highlight areas for improvement, suggest revisions directly on the document, and provides better readability.
Insert Blank Pages For Double-Sided Printing
When selected, this option will insert a blank page with 'THIS PAGE INTENTIONALLY LEFT BLANK' centered on the page when either the Project Table of Contents, Section Table of Contents, or Section(s) end on an odd page number, to facilitate duplex printing to hard copy or PDF only.
![]() Always verify the output does not contain unwanted blank pages. This can occur when a special control character pushes the page over to another sheet. The unwanted blank pages can be manually removed or deleted from the PDF document using a third-party PDF editing software such as Adobe Acrobat.
Always verify the output does not contain unwanted blank pages. This can occur when a special control character pushes the page over to another sheet. The unwanted blank pages can be manually removed or deleted from the PDF document using a third-party PDF editing software such as Adobe Acrobat.
Process and Print/Publish common controls

Printer
A drop-down box that provides a list of available printers. The Setup button opens the Windows Print Setup window to allow setting changes like duplex printing.
Process & Publish or Process & Print
Applies the choices on the tabbed screens and sends a copy to the selected printer.
Process Only
Applies the choices on the tabbed screens and sends the results to the Processed Files folder under the Job in the SI Explorer.
Save Settings
This feature saves your choices on the tabbed screens for future use in Print Processing except for the Sections you choose to include or exclude from printing.
![]() If you want to save some but not all settings, first select the settings you want to keep as defaults, click Save Settings, and then make the additional selections that won't be part of the saved defaults.
If you want to save some but not all settings, first select the settings you want to keep as defaults, click Save Settings, and then make the additional selections that won't be part of the saved defaults.
![]() If you want to make permanent changes to the Headers and Footers, but you will want to select different reports the next time you process Sections, you would make the changes on the Header/Footer tab first, click the Save Settings button, and then choose the Reports you want to run.
If you want to make permanent changes to the Headers and Footers, but you will want to select different reports the next time you process Sections, you would make the changes on the Header/Footer tab first, click the Save Settings button, and then choose the Reports you want to run.
Reset Settings
Resets any custom settings on the tabbed screens to the application's default settings.
Standard Windows Commands
 The Cancel button will close the window without recording any selections or changes entered.
 The Help button will open the Help Topic for this window.
Additional Learning Tools
![]() Watch the Options tab Overview eLearning module within Chapter 4 - Process and Print/Publish.
Watch the Options tab Overview eLearning module within Chapter 4 - Process and Print/Publish.